

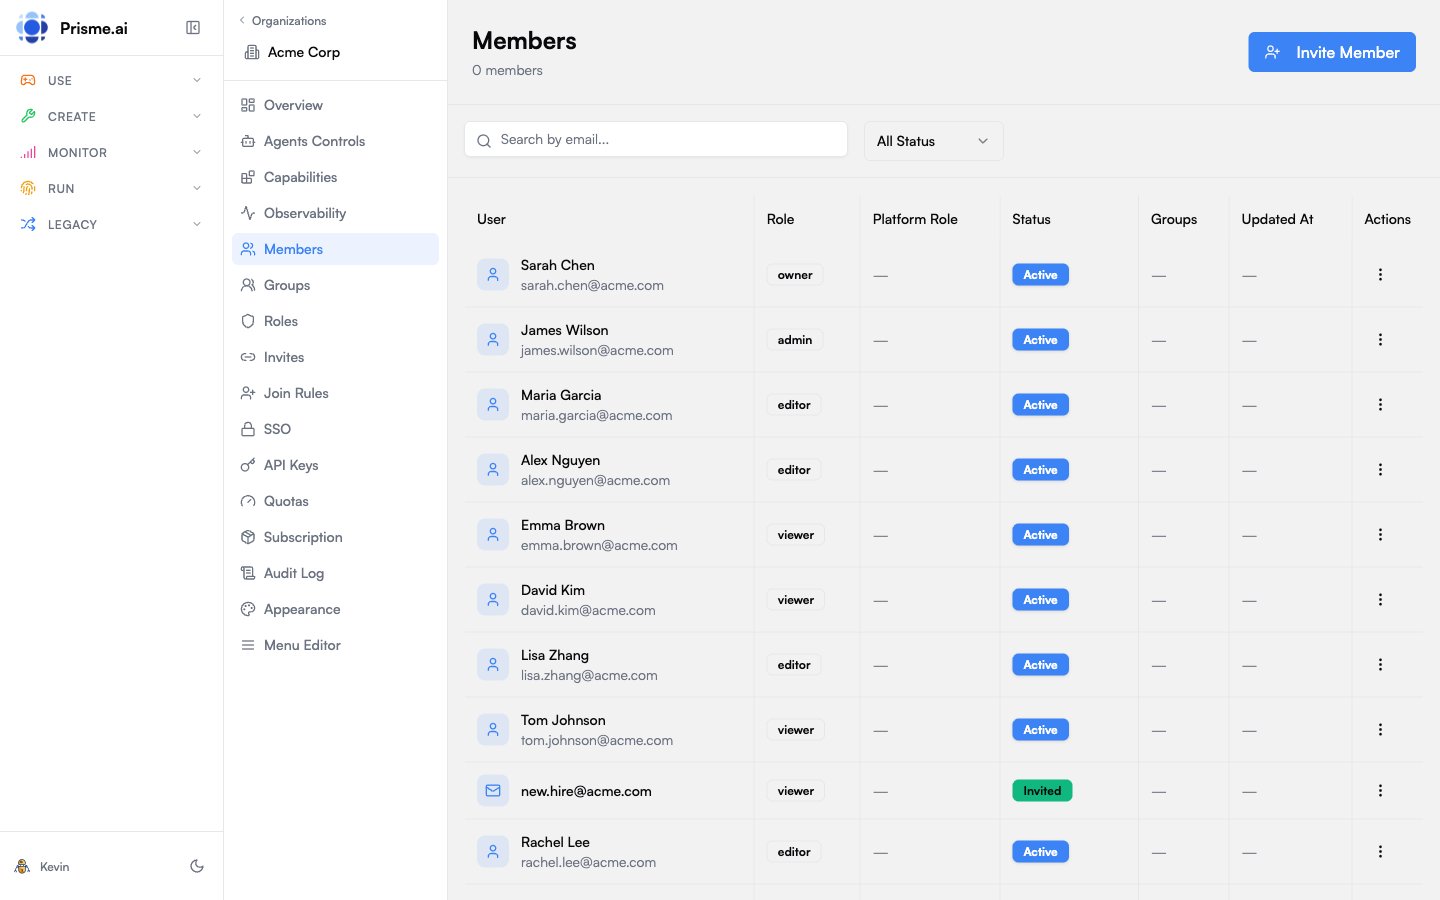
Members
Members are users who belong to your organization. Each member has:- A role that defines their permissions
- Optional group memberships for bulk management
- A status (active, invited, or suspended)
Inviting Members
- Go to Members in the sidebar
- Click Invite Member
- Enter the user’s email address
- Select a role to assign
- The user receives an invitation email
Member Status
Managing Members
- Change Role: Click on a member, select a new role
- Suspend: Temporarily disable access without removing membership
- Remove: Permanently remove from the organization
Roles & Permissions
Roles define what actions members can perform. Each role contains a set of permissions.Permission Format
Permissions follow a hierarchicalproduct:resource:action pattern with wildcard support:
Wildcards are supported at any level:
orgs:members:* grants all member actions, storage:* grants all storage permissions, * grants everything.
Resource Scopes
Scopes restrict which specific resources a role can access, independent of permissions. They use the formatproduct:resource:id:
*grants access to all resourcesagent-factory:agents:*grants access to all agents- Empty or omitted scopes mean no resources are accessible
Built-in Roles
Organizations come with system roles that cannot be deleted:
All system roles except
owner can be customized per organization. When an admin edits a system role in the Governe UI, a custom role override is saved for that organization that fully replaces the system definition.
Creating Custom Roles
- Go to Roles in the sidebar
- Click Create Role
- Enter name and description
- Select permissions using the Permission Tree Editor
- Checking a product node sets the product-level wildcard (e.g.
storage:*) - Checking a resource node sets the resource-level wildcard (e.g.
storage:vector_stores:*) - Individual actions can be toggled independently
- For products supporting instance scoping, a Scopes section appears under each resource, allowing admins to set the “All resources” wildcard or add specific resource IDs
Groups
Groups organize members for easier bulk management. Use cases include:- Department-based access (Engineering, Marketing)
- Project teams with shared permissions
- Geographic regions
Creating Groups
- Go to Groups in the sidebar
- Click Create Group
- Enter name, slug, and optional description
- Add members to the group
Using Groups with Join Rules
Groups work with Join Rules to automatically add new users to the right groups based on their attributes.SSO Configuration
Configure Single Sign-On with your corporate identity provider.Supported Providers
SSO Config Structure
SSO configuration is stored as part of the organization object (ssoConfig field):
Adding an OIDC Provider
- Go to SSO in the sidebar
- Click Add Provider
- Select OIDC
- Enter configuration:
- Configure attribute mapping to map IdP claims to user fields
- Optionally restrict to specific domains (e.g.,
@acme.com) - Enable the provider
Adding a SAML Provider
- Go to SSO in the sidebar
- Click Add Provider
- Select SAML
- Enter configuration:
- Download the SP metadata to configure your IdP
- Enable the provider
Domain Validation
When updating SSO config, the system validates that domains are not already claimed by another organization. If a domain conflict is found, the update is rejected with aDOMAIN_ALREADY_USED error.
Secrets Encryption
SSO provider secrets (OIDCclientSecret, SAML certificates) are encrypted at rest using envelope encryption (@prisme.ai/secrets) when the SECRETS_MASTER_KEYS environment variable is configured:
- A per-organization Data Encryption Key (DEK) encrypts the SSO config
- The DEK is wrapped by a platform-level Key Encryption Key (KEK) using AES-256-GCM
- Wrapped DEKs are stored in MongoDB alongside the org; plaintext secrets are never persisted
SECRETS_MASTER_KEYS is not configured, SSO configs are stored in plaintext.
Join Rules
Join rules allow automatic organization membership based on user attributes. Rules are evaluated dynamically and can assign both a role and group memberships.Rule Structure
Each join rule contains an array of conditions with AND logic — all conditions in a rule must match:Condition Fields
Creating a Join Rule
- Go to Join Rules in the sidebar
- Click Add Rule
- Define conditions
- Select the role to assign
- Optionally select groups to add the user to
Rule Evaluation
Join rules are evaluated on every/me API call (the first call the platform makes after authentication). A per-user version cache ensures rules are only re-evaluated when they change:
- Each org’s join rules have a version counter (incremented when rules are updated)
- The gateway tracks which version was last evaluated for each user
- If the version matches, evaluation is skipped for that org
Re-evaluation on Rule Changes
When an organization’s join rules are updated, the platform re-evaluates all existing members who joined via join rules:- Members who no longer match any rule are automatically removed from the organization
- New users who now match are not retroactively added — they join on their next
/mecall - Re-evaluation processes members in batches of 500
Joining Organizations — Comparison
There are four mechanisms for users to join an organization:Invitation Codes
Invitation codes let you share a link that grants access to your organization.Creating an Invite
- Go to Invites in the sidebar
- Click Generate Invite
-
Configure:
- Role: What role invitees receive
- Max Uses: Limit how many times the code can be used (optional)
- Expiration: When the code expires (optional)
- Share the generated link
Invite Status
API Keys
API keys (iak_*) enable programmatic access to the Prisme.ai platform from external systems. They are scoped to an organization and carry specific permissions and resource scopes.
Key Format
All API keys use the formatiak_{orgSlug}_{uuid}:
orgSlug allows the auth middleware to resolve the organization without a database lookup. Keys are stored hashed — the plaintext key is returned only once at creation time.
Creating an API Key
- Go to API Keys in the sidebar
- Click Create API Key
- Enter a name
- Select permissions using the Permission Tree (same
product:resource:actionformat as roles) - Optionally set scopes to restrict to specific resources (e.g.,
agent-factory:agents:agent-abc-123) - Set an expiration date if needed
Scopes
Scopes restrict which resources a key can access, even if the permission allows the action. They use the sameproduct:resource:id format as role scopes:
agent-factory:agents:* grants access to all agents, * grants access to all resources.
Using API Keys
Include the key in thex-prismeai-api-key header:
How API Key Validation Works
API key validation is handled natively by the platform runtime. When a request includes aniak_* key, the runtime resolves the organization, permissions, and scopes, then injects them into the standard run.permissions and run.scopes variables — the same variables used for user session auth. No cross-workspace HTTP call is needed.
Rotating Keys
- Click on an API key
- Click Rotate
- A new key is generated with zero downtime — the old key is immediately invalidated
Service Accounts
Service accounts are non-human identities for machine-to-machine authentication. Use them for:- CI/CD pipelines
- Backend integrations
- Automated workflows
- Scheduled tasks
Creating a Service Account
- Go to Agents Controls > Service Accounts
- Click Create Service Account
-
Enter:
- Slug: URL-safe identifier
- Name: Display name
- Role: Permission set to assign
- Copy the generated client secret
Authenticating as a Service Account
Exchange the client credentials for an access token:Managing Service Accounts
- Enable/Disable: Toggle access without deleting
- View Last Used: See when the account last authenticated
- Rotate Secret: Generate a new client secret
Best Practices
Least Privilege
Grant only the minimum permissions needed for each role
Use Groups
Organize members into groups for easier permission management
Rotate Credentials
Regularly rotate API keys and service account secrets
Audit Access
Review audit logs to monitor permission changes
Join Rules
Automate onboarding with join rules for consistent access
Expire Invites
Set expiration dates on invitation codes